*This post may contain affiliate links for which I earn commissions.*
04/25/2024 Update: It seems that the links showing how to create this are no longer valid and I haven't been able to find a new source with instructions. Please let me know in the comments if you know of instructions for creating this potion book.
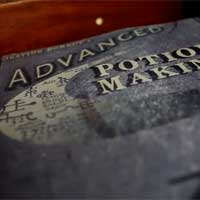
The Advanced Potion Making book was an important part of the sixth story, Harry Potter and the Half-Blood Prince. This is the book that Harry got that was in bad shape and had writing all over the inside from someone who called himself the Half-Blood Prince.
Harry came to trust the Prince because the written instructions were far superior to the book's instructions. It didn't take long for Harry to excel under the Prince's guidance. Of course, we all know that the Prince eventually turned on Harry when Harry used the spell for enemies against Draco Malfoy.
Want to make your own Advanced Potion Making book? You can and this video will show you every step you need to take, including how to resize the book's cover to fit whatever book you decide to use.
Some people have a difficult time destroying a book (I'm one of those people) so perhaps you should take a trip to your local thrift store and find a cheap used book that you won't mind modifying. If you find a book that's already worn then consider that an added bonus.
Or, you can use a blank sketchbook if you are creative and want to fill it with your own potions. Make sure the sketch book is thick enough to pass for a school textbook. And don't forget to add notes from the Prince!
What You Need To Make The 'Advanced Potion Making' Book
- Hardcover book OR
- Hardcover blank sketch book
- Book cover printout - here is the link mentioned in the video: 'Advanced Potions Book' template
- Thick paper or card stock paper
- Paint brushes
- Coffee
- Glue
- Sandpaper
Do You Need Any Of The Above Items?
Instructions
Use a paint brush to apply coffee to the outside pages of the book. This will give the book an aged look.
Dry the book with a hair dryer until the pages are dry. If the book is not completely dry then the pages might begin to mold.
Click the link for the book cover template and save the template to your computer.
Open the template in a text document, such as Word or OpenOffice, and set the page size to 100%. This will allow you to see the actual size of the template.
Hold your book up to your computer screen and scale the template up or down until the template is the right size for your book. I suggest that you leave the template open on your computer in case you made a mistake in scaling it and need to make an adjustment to the scale.
Print the cover on thick paper or card stock. Thick paper or card stock is much more durable than regular paper and your finished product will look more like an actual textbook if you use thick paper.
If your book is small enough that the printed cover will fit completely on the book then cut away the white edges of the cover. If your book is large then you might need to print several covers and cut out both covers and the spine, so you have three pieces to be applied to your book.
Use a paint brush to apply glue to the book and put the printed cover on the book as follows:
- If using a single piece of paper for the entire book then apply glue to both front and back covers, as well as the spine. Place the printed paper on the entire book and make sure that the book closes completely with the cover on it.
- If you cut the covers into three pieces then apply glue to the entire front cover of the book only and put the printed front cover on the book. Repeat for the back of the book and spine.
Rub the covers onto the book so that all parts of the paper are smooth and come in contact with the glue. Let the glue dry completely.
Rub sandpaper on the cover to make the book look old and worn.
Optional: Tear the book away from the spine about an inch or so on the front or back cover.

Hi, is there an updated link to the template?
Thanks!
Sadly, I have not been able to find a new link. I’ve updated the post stating this, and asked for someone to post a link in the comments if someone finds a working source.